Scheduling an email in Outlook can be a great way to manage your communication effectively. Whether you want to send a reminder or simply want to ensure your email reaches the recipient at a specific time, knowing how to schedule email in Outlook is essential. Follow this step-by-step guide to learn the process.
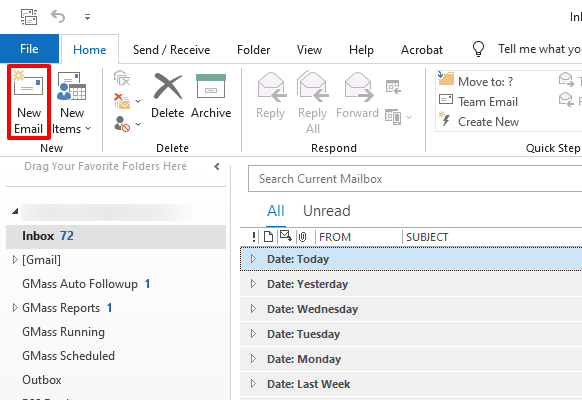
Compose a New Email
Open Microsoft Outlook and click on "New Email" to compose a new message. This will open a new email window where you can start drafting your message.
Fill in Email Details
Fill in the recipient's email address, subject line, and body of the email as you normally would. Make sure to include all necessary information to ensure clarity in your message.
Access the Tags Group
Look for the "Tags" group in the Ribbon at the top of the window. This section contains various options related to email management.
Find More Options
Click on the "More options" arrow (it may appear as a small icon or a downward arrow). This will allow you to access additional settings for your email.
Navigate to Options Tab
If you are using the simplified ribbon and do not see the "More options" arrow, click on the "Options" tab in the Ribbon. This tab provides various features related to email formatting and delivery.
Select Delay Delivery
From the "Options" tab, select "More commands." In the dropdown menu, choose "Delay Delivery." This option is crucial for scheduling your email.
Open Properties Window
A new window titled "Properties" will open. This window contains settings that allow you to specify when your email should be sent.
Set Delivery Options
In the "Delivery options" section, check the box that says "Do not deliver before." Set the desired date and time for when you want the email to be sent. Make sure to select a time that is convenient for the recipient.
Close the Properties Window
After setting the date and time, click "Close" to return to your email. This will take you back to the main email window where you can finalize your message.
Review Your Email
Review your email to ensure everything is correct. Double-check the recipient's address, subject line, and content to avoid any mistakes.
Send the Scheduled Email
Click "Send" to schedule the email. The email will remain in your Outbox until the specified delivery time.
Check Your Outbox
To verify that your email is scheduled, you can check your Outbox. The email should be listed there until it is sent at the scheduled time.
Ensure Outlook is Active
Ensure that Outlook is open and connected to the internet at the scheduled time for the email to be sent. If Outlook is closed or offline, the email will not be delivered until the application is active again.
Edit or Cancel Scheduled Email
If you need to edit or cancel the scheduled email, go to your Outbox, open the email, make the necessary changes, and resend it or delete it. This flexibility allows you to manage your scheduled emails effectively.
By following these steps, you will have mastered how to schedule email in Outlook, making your email communication more efficient and timely.
If you liked it and want to know more content similar to How to schedule email in Outlook: Step-by-Step Guide. Visit our category Tutorial


By posting you agree to the Privacy Policy
Basic information on data protection